The Cogran Front Page
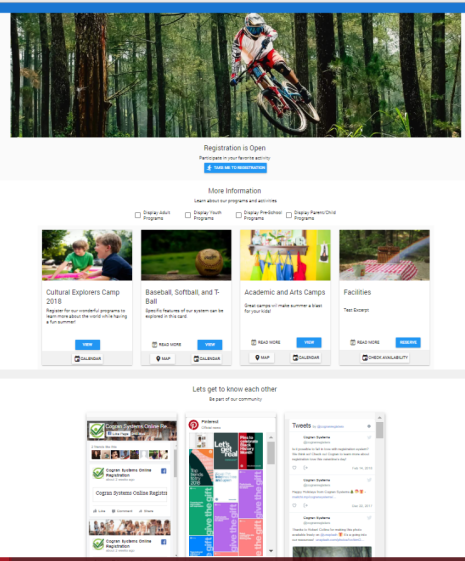
Cogran Registration Software includes a customer-facing website to improve the ease of signing up for programs and for making reservations. The Cogran Front Page displays product listings, company information, includes a shopping cart, and allows calendar-based program and facility selection. The Cogran front page adds a new user experience that is packed with images, information, and functionality.
When your customers visit your site, they are seeking to register for a program or reserve a location—but they also want to know that they can quickly register for a program, as well access information about programs, places, maps, schedules, and more.
Users click from a link in an email or client website to land on the Cogran Front Page, which displays a banner, a link to the registration period, sorting options, and cards that include additional information about registration and reservation opportunities, calendar, maps, schedules and standings.
WHAT THEY SEE
On the Cogran Front Page, a banner can be selected from a comprehensive, free assortment of images that come with every Cogran System. Or, users can include their own imagery in the media library. You can also include text below the banner and a quick button that takes users directly to registration.
The Cogran Front Page can Include:
- A top menu bar with company name and login button
- A banner image
- A banner message with subtitle
- A subhead with subtitle
- An option to update an account (option)
- A card message with subtitle
- Rows of cards (Registration Options)
- Optional Social Media Feeds
- Footer with Contact Information
CARDS AND REGISTRATION PERIODS
To appear on cards, registration options are assigned to cards.
INSIDE A CARD
Most of the buttons that appear on the card appear as a pop-up that allows users to remain on the home screen. These options are optional, but can be very useful.
- Maps: Use the power of Google Maps to embed maps into your Cogran cards. Include a map with a single location pinpointed, or drop in a large number of pins to show all relevant locations.
- Read more: This section of the card is used to explain any level of information that will help users learn more about the registration/reservation options that appear on the card. Include images, lists, and volume. An example of a maximized “more info” for a facility reservation card appears below.
- Games: Game schedules and standings are displayed if this option is selected during schedule and standings setup. The teams schedules are accessible without any login, to allow easy verification, and the games can be downloaded to ical for import to an individual’s calendar. Toggle to standings and select a team to view the standings.
- Calender: Program calendars display calendars that highlight today’s date in magenta, and show dates with programs on them in indigo. Today’s programs appear below the calendar by default. By clicking on indigo dates, the programs scheduled on those dates will appear below. This calendar can also be viewed as a week and day view.
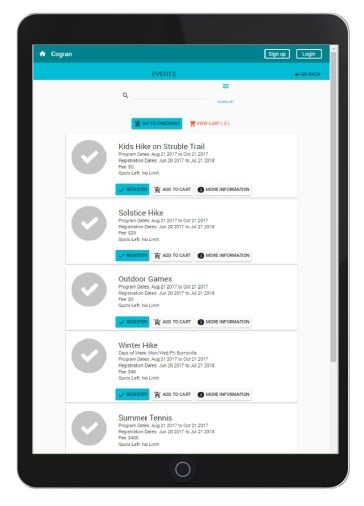
- View:
 By clicking “view,” a user is propelled from the card into the registration program list. User can then begin to add items to a shopping cart. These items remain in the shopping cart until checkout. A program list might look like the pictured example.
- After adding items to a cart, the user can click “go back” to return to the page that includes the cards. A user is able to add registration programs from multiple cards to the cart.
- This list is also searchable by using the Search field at the top of the page. For more detailed filtering, clicking the three-bar icon labeled “filter list.”
- The filters that appear are activated during program and registration period setup, so not all filters will always be available.
- Once viewed, the registrant can click “register” or “add to your list.” The “register” button takes the user directly into registration, but the “add to your list” button adds the item to a shopping cart. This allows users to continue to shop amogst programs before beginning to register.
- Filters: Complex organizations may have fifteen, twenty or more cards. Visually sorting through all of the cards might be time-consuming for users. Apply filters to make it simple for users to find the right set of cards. For example, users may be only seeking room reservations. In this way, users can curate the appearance of the Cogran Front Page to expose only certain cards. By default, no cards will appear.
 By clicking “view,” a user is propelled from the card into the registration program list. User can then begin to add items to a shopping cart. These items remain in the shopping cart until checkout. A program list might look like the pictured example.
FOOTER
Your Cogran System footer information will largely populate from your initial system setup. It can be updated and enhanced here.
It includes:
- Footer Text
- Organzation Name
- Address
- Contact Name
- Contact Email
Next Steps:
After updating the Front Page, the next step is to create cards, which allow reservations and registrations.